Google Story Builder

This is what I’m messing around with today–reminds me of an old fave, Google Search Stories, that isn’t around anymore. 😥

https://docsstorybuilder.appspot.com/0OW5Vbc4r

I know we spend a lot of time talking about Google Docs/Drive/Sheets/Slides/Forms/Classroom, but don’t forget some of these other cool Google tools (Smarty Pins, A Google A Day, etc.)!

Google Story Builder

Monday Funday!

During the #JulyiPadChallenge, Mondays have been devoted to free digital tools that let teachers communicate with parents. Check it out here.  

Parents love seeing pics of their kids!

Today is the perfect day to experiment with photo captioning tools like Quick, Canva, Skitch, PicCollage, PicFont, PhraseIt, and YouDoodle.

Or, bring photos to life with Chatterpix, BlabberizeTellagami, or YakIt Kids!

Think about how you or your students could use these tools in your classroom.  Then remember, once you’ve created something cool, it can be shared with parents using tools we’ve already talked about during the challenge…like Twitter, Remind, Instagram, and Seesaw!

ETA: Photo Mapo is free today, so grab it and add it to the list!

Monday Funday!

Day 22, Toontastic

During the #JulyiPadChallenge, Wednesdays are devoted to a variety of digital tools that help teachers engage students…ranging from apps that make QR codes, to quizzing apps, to creation tools like the one featured today.  Read more about the challenge here.  

I’m a fairly late adopter but (now) a true fan of Toontastic, one of several awesome apps by Launchpad Toys.  My own kids have had so much fun creating cartoon stories at home this summer, and it’s been a huge hit with grade school teachers who’ve attended my workshops in the past few months.  The videos are super easy to save to the camera roll and/or upload to YouTube.

Once you download the free app, you’ll see an option to click a Parent Guide, which I think serves as an excellent explanation and introduction for teachers, too.  Read through that guide to learn much more about this cool tool.

Also note that there are awesome educational resources on the Launchpad Toys site here. Several good Toontastic freebies on Teachers Pay Teachers, too; click here.

Day 22, Toontastic

Day 21, Vidra

During the #JulyiPadChallenge, Tuesdays are devoted to digital tools that help teachers flip or blend course content. That means most of the tools featured on Tuesdays will let teachers record videos that students can watch from home or outside of class. Read more about the challenge here.  

If you know me in real life, you know that I’m always up for a cool new PowerPoint alternative! Vidra is new to me this summer but I’ve found it to be super user-friendly, and it also produces some really slick looking videos!  I particularly love that it will upload straight to YouTube, and that you can save your finished product to your camera roll (to perhaps be smashed into something else!)

Check out this video I made earlier this summer, and then you could Google around to find other information about how teachers are using Vidra in class.  I think it’s just another great free tool to add to your “digital toolbox,” and like I said, anything that’s not bullets on a PowerPoint slide is a winner in my book!  😉

Day 21, Vidra

Day 20, Seesaw

During the #JulyiPadChallenge, Mondays are devoted to free digital tools that help teachers communicate (and share student creations) with parents. Read more about the challenge here.

Student digital portfolios have been a passion of mine for the last several years, and after much experimentation and research, I am going to be using Seesaw with all of my students from here on out!

Considered a “learning journal,” Seesaw lets students and teachers create, capture, and share artifacts of student learning.  It’s designed to be student-driven, so students can collect their own samples without a lot of adult oversight and intervention.  This, and the ease of parent sharing, will make it an easy sell to teachers who are new to this excellent digital tool.

The help section of Seesaw’s website is so user-friendly and thorough that I haven’t created many of my own support materials for teachers, so if it’s still new to you, check it out these materials to get better acclimated to this wonderful free resource for creating and sharing student portfolios.

IMG_1731

I’ve also written about Seesaw here and here, so click the links to read more about how to use it during the upcoming school year.  My very first Seesaw photo how-to guide is here.  If you’re feeling really excited about trying Seesaw today, practice by using Mr. Badura’s app task challenges!

We’ll be using Seesaw K-12 in my district this year, but my experience with it so far has been mostly with 11th and 12th graders.  I’m happy to help if you have concerns about how this might work with “big kids!”  I’m a Seesaw Ambassador, so feel free to connect with me (here or on Twitter) if you have specific questions that I can answer.

Day 20, Seesaw

Tackk Attack!

During the #JulyiPadChallenge, Thursdays are devoted to digital tools that showcase student creations. Read more about the challenge here.

Tackk is one of my favorite and most-often-used free digital tools! I use it in multiple ways:  last year, for some student digital portfolios…for projects with big kids…and TONS of times for presentations, trainings, and PD with grownups.  You can add both text and images to a Tackk, of course, but the best thing is how many links and other media you can easily embed.

It’s the perfect tool when you just need to create a “page” or project (something to share or present) really quickly and/or using a tool that’s extremely user-friendly.  I particularly love two features about Tackk:  the fact that you can duplicate an existing one (so you don’t have to go back to a blank slate, so to speak, on font, color, etc.), and the fact that you can transfer ownership (so I as a teacher could start one, set it up how I wanted it, and let a student finish by making them the new owner of the project.)

Here is a how-to guide I made some time ago; some things might look differently depending on whether you are using the web version or the app version (and probably some features have updated since I made this guide.)

If you make a Tackk this summer as part of a workshop or conference, be sure to label it #TackkPD!

Tackk Attack!

Day 14, Educreations and Other WhiteBoard Apps

During the #JulyiPadChallenge, Tuesdays are devoted to digital tools that help teachers flip or blend course content. That means most of the tools featured on Tuesdays will let teachers record videos that students can watch from home or outside of class. Read more about the challenge here.  

“Mark” my word: once you teach in a 1:1 environment, your need for those yucky dry erase boards and markers will seriously diminish!

FullSizeRender (31)

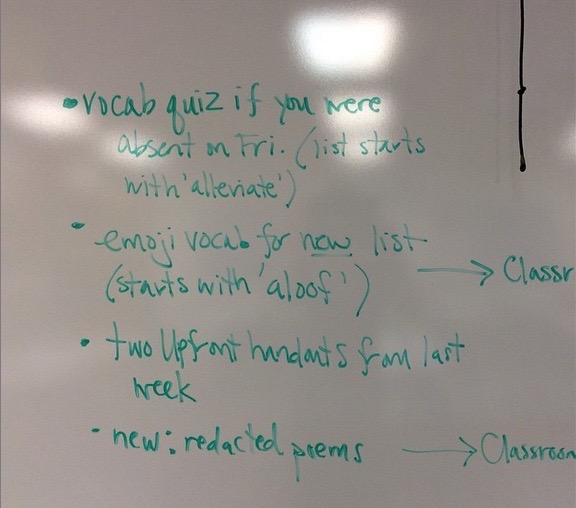
(In fact, it’s so rare that I write on my big whiteboards rather than project from my iPad that I had to take a picture once this year because it was such an anomaly! You can see the cord from the screen in the corner of the image; I had pulled up the screen for this rare writing-on-the-actual-board day!)

IMG_1637

(No offense to anyone who still enjoys writing on a whiteboard…which I’ve never really liked, because you have to turn your back to your students and because I have really bad handwriting!)

Here are some of our teachers’ and students’ favorite whiteboard apps and some brief info about how they are used in class.

These are all great free tools that will let you record video while writing or drawing on a whiteboard, and then when you can share or save the recordings when they are complete.

I’ve noticed that teachers tend to favor one and nobody in my district really uses ALL of these in their classes, but it’s nice to take a day like today and experiment with all of them to find the right one for your class, task, or activity.  I’m certain there are many more that I’m forgetting to list here, too.

I personally use Educreations the most (which is why I featured its icon on the July iPad Challenge calendar in today’s square), but we have math teachers who are devoted pretty exclusively to either ShowMe or Doceri.  Similarly, some of our elementary school teachers (especially in early grades) really favor ScreenChomp.

If you are looking for a “dead-simple” (their term!) whiteboard app, this is the one.  I think I grabbed it once when it went free, but I really like it and would recommend it if you want something that’s extremely simple for you and your students.  This one actually will just save images to your camera roll (which you could obviously smash into some other app), but it does not record video.

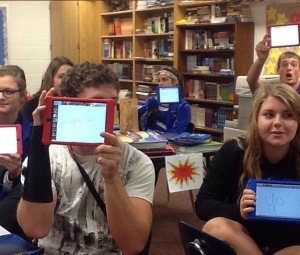
I would use an app like this in lieu of a student’s individual small dry erase board, like the ones I used to buy in the Target $1 spot and use for classroom activities like Showdown (a cooperative learning activity we like.)  Here’s a picture of my students using their iPads as if they were small dry erase boards for this activity.

IMG_1636

I’m a really late adopter to this awesome, oft-cited, and well-reviewed app and am committed to doing more with it this year! Many other ed tech bloggers and writers have attested to its benefits, so I’ll let you Google around to read more about this as we work together to integrate this one into our lessons!

These might technically be more “drawing” apps than what I would think a teacher would need to use for flipping a lesson, but hey, I have seen both used by teachers in some pretty cool ways (and to generate some super student creations).  So today might be the day to play around with these, too!

Okay, this one I’m really excited about.  It’s new to me as of this summer, and I posted a link to this article (linked above) once before on this blog.  I tested it out with grownups in a workshop last month, and it’s really slick.  I can’t wait to use this one in class (though I think this is one kids and teachers could use together, outside of class/from home, to work on tricky problems.)

And though I think of math problems when I think of collaborative whiteboarding, I think the sky is probably the limit here.  (As a former/reformed h.s. debate coach, I also like the idea of maybe having students collaboratively flowchart a practice debate round using this free digital tool!)

Bonus:  since this one is web-based, I think you could consider it “device neutral” and use it on Chromebooks or laptops, too.  (I obviously focus on iPad apps for this particular PD challenge, but it’s worth pointing this out for my readers who might have different devices in their 1:1 schools.)

This is probably my most-used and most-recommended app; it comes up in all of my workshops (regardless of the topic), and we really do use it with students K-12 in my district. It’s really the best tool (in my opinion) for PDF-annotating or what I like to refer to as “doing a worksheet on an iPad.”

(And yes, I get it that “worksheet” is kind of a dirty word at this point and we usually are doing something way cooler, creation-wise, on our iPads, but you know what I mean. Sometimes you just need kids to complete a graphic organizer or fill in the blanks on something, and this is the right tool for that.)

While I usually think of this as an annotating app, remember it really does record audio and is a great tool for giving feedback to students or even for recording a small-group discussion in the classroom.  And besides Smart Whiteboard (mentioned a few bullet points above), this is also my go-to when I need to type or write something in class really quickly to project instantly on the screen.

Finally, since we’re going to be using Seesaw K-12 next year, I’m definitely recommending that teachers consider using the “Draw” screen in that app as one of their main whiteboard tools (especially for our littlest learners.)

Once they have acclimated to using Seesaw, the whiteboarding (which includes both type and draw, plus audio) options available from the Draw screen might eliminate the need for an app like ScreenChomp, for example.  And not that I usually get too hung up on the concept of kids having too many apps, but there is probably something to be said for a little streamlining and not cluttering up a kid’s device with multiple apps that do the same thing.

Obviously the bonus with Seesaw is that it is the student’s digital portfolio, so whatever a student whiteboards in the app would be saved somewhere permanent (and you wouldn’t have to worry so much about getting kids to save to camera roll.)

Let me know what other apps you use in place of dry erase boards and markers.  There are some really awesome free tools on this list, and I can’t wait to hear more of your ideas!

ETA: Some great tools mentioned in this article, too.

Day 14, Educreations and Other WhiteBoard Apps

“Insta” Gratification

During the #JulyiPadChallenge, Mondays are devoted to free digital tools that let teachers communicate with parents. Check it out here.  

This article gave me some of the best ideas for my school Instagram account this year and inspired a lot of my posts.  Let me know how you think you could use Instagram to share samples of student creations with parents!

Don’t forget, Instagram is also a great tool for “app smashing.” Peek ahead two Mondays on the July iPad Challenge for a list of TONS of photo editing and captioning tools that you can use before posting your pics on Instagram.  (The example you see here was created with Word Swag, for example.)

IMG_1631

“Insta” Gratification

Are You Part of the 44%

IMG_1608

During the #JulyiPadChallenge, Fridays are devoted to growing the PLN! Check it out here.  

According to research cited here, nearly half of Twitter users never tweet!  Obviously there’s a HUGE (and presumably growing) community of teachers on Twitter who value it for the collaboration, off-hours PD, and general development of PLN, but my suspicion is that a lot of teachers (at least some of the ones I work with) have an account that they either never use or have long since abandoned.

If you too are one of the 44% (maybe you created your Twitter account at a workshop or inservice…maybe at one of mine!) and you haven’t quite fallen in love with Twitter for PD/PLN, today’s your day! Click through some of the links below to learn more about what Twitter can do for you.

  • Lots of awesome Twitter ideas, resources, and infographics here.
  • Here’s a pretty comprehensive list of educational Twitter hashtag chats.
  • I love this list of Twitter tools, too!

I’m not sure if people believe me when I say this, but I really do get most of my good/new ideas from Twitter!  All it takes is a few follows, a few hashtag chats, and a few clicks on the right resources, and I guarantee you will revolutionize your teaching.  Happy tweeting!

Are You Part of the 44%

Day 9: Padlet

ETA: Padlet became an app today! Wahoo!

I have had a lot of success using Padlet for bellringer activities, silent discussions, exit tickets, and more.  I chose Padlet for the #JulyiPadChallenge because of its ease of use and because it is truly “device agnostic;”  teachers and students can use it across devices and platforms.  It’s a great way for students to “show what they know,” which is our focus on Thursdays this month.

Formerly known as Wallwisher, Padlet lets students collaborate and contribute to a common space.  Students don’t need to create an account, remember an ID/password, or log in. They just need to open the link I give them (I create the Padlet walls in my account) and then start adding to the wall!  (See the image below for a glimpse of what that usually looks like in my class.)
Screen Shot 2015-07-08 at 6.53.56 PM

The background and layout can be customized, and students can add both text, links, and images.  More specifics and a lot of helpful info can be found here.

One of my favorite features of Padlet is that it instantly generates a QR code that I can project on my screen.  (Select ‘mobilize’ under the Share/Export tab to generate the code.) All my students have to do is scan the code to open the wall.  (I don’t have to e-mail, project, or Chirp the link, though any of those options would also work.) Chrome/Chromebook users, also note that there’s a Chrome app and a Chrome extension for Padlet.

It’s also super cool that there are so many options for saving and sharing once you are done with a Padlet wall; you can e-mail it, save it as a .jpg or .pdf, print it, or embed it.  And you can also post it to Twitter, Pinterest, and a bunch of other platforms as well!

If you’ve never tried Padlet, today is your day!  Let me know how you think you will use it in class!

ETA:  I forgot to mention that since you can upload your own image to be the background of your Padlet wall, graphic organizers like these work really well for organizing your notes. Thanks, Erin, for the tip!

Day 9: Padlet